The content of the article
It is believed that gloxinia propagates only by dividing tubers and leafy cuttings. However, it grows well from seeds. True, you have to thoroughly dance with the sprouts until they enter full force. But what a magical joy it is to see how a full-grown adult plant is born almost from dust!
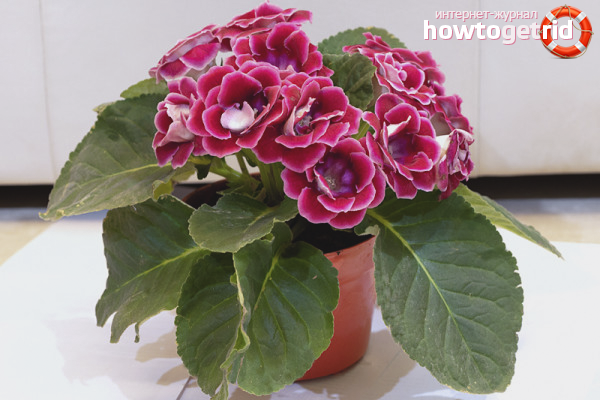
How to grow gloxinia from seeds? Now we learn everything in detail.
When to plant gloxinia
We need a plant from seeds to rise and grow to adult sizes. At the same time, it should bloom, grow the tuber and go into a dormant state. Modern gloxinia, as a rule, begin to bloom at the age of 6-7 months from the appearance of seedlings. This is with proper care.
Based on this, we calculate the time of sowing. Gloxinia hibernates around September-October. Less time for flowering. And minus the period of development from seedlings. It turns out that you need to sow no later than mid-February. It used to be even better, but that is if you can provide good lighting.
Sow gloxinia
Sowing is the most difficult. Gloxinia seeds are very small. You can’t even breathe in their direction, otherwise they will fly apart. Therefore, it is recommended not to assemble them yourself, but to purchase ready-made ones. Manufacturers often granulate them and pack them in capsules so as not to lose.
These granules, when improperly sown, are often an insurmountable obstacle to seedlings. How to sow gloxinia? First you need to prepare the soil and tanks.
Tableware. A container with a practically sealed lid is best suited. It is desirable that it be transparent. Because gloxinia rises only in the light. In the dark shoots can not wait at all.
Instead of a cover, you can use glass or polyethylene. Only a snug fit to the sides of the vessel. After all, it is necessary to maintain a high level of humidity constantly. And you need to accustom seedlings to ordinary air gradually.
Polyethylene can be pressed to the sides of the container with rubber or clothespins.
Priming. Buying the finished mixture in the store, you eliminate the need to cook it yourself. But having prepared the soil with your own hands, you will surely be confident in its quality and composition.
For example, go to the forest or park. Find birch and pine there. Gather the earth from under them and carry home. There it is carefully sieved, mixed in equal shares. Then add the same proportion of pure sand. Everything, the mixture for gloxinia is ready.
But no one has canceled the disinfection. Indeed, in a humid warm environment putrefactive processes develop very quickly. And they are not at all in favor of young shoots. Therefore, it is necessary to place the mixture twice in the freezer with intermediate thawing. Then spill it with a strong hot solution of potassium permanganate. And after 12 hours, calcine in the oven at a temperature of + 105-110 ° C. This will destroy the spores of fungi and harmful microorganisms.
Description of the process step by step:
- Prepared soil is poured into the bottom of the tank, leveled and compacted. Lightly, not up to the briquette.
- Spray generously with warm water from a spray bottle. The ground should be moist, but not wet.
- Gently lay the seeds on the surface.
- Close the container tightly with a lid.
All sowing is finished. It is very important to water the ground before the start, because then the seeds can fall into the ground. And deepening even by 0.5 cm sharply reduces the chances of emergence.
We are waiting for the sprouts
Now our container with crops needs to be put in a warm bright place. The windowsill will not work, it’s too cool there. Alternatively, place the container in a special warm cuvette made of polystyrene foam or foam backing. Plus add extra lighting. Happy owners of phytolamps, it's easier for you. Although, fluorescent lamps are also suitable.
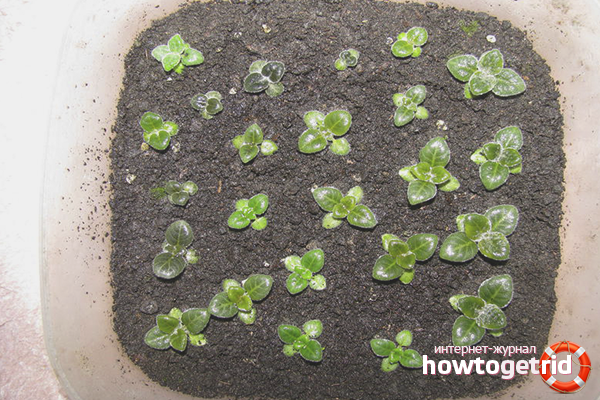
It is very important not to open the lid of the container until the first shoots appear. High humidity and heat contribute to seed germination. But, depending on the expiration date and conditions, this process can last from 2 weeks to 3 months.
Quality seeds sprout quickly. The bad ... do not emerge at all. The only clarification: as soon as the first green sprouts appear, do not rush to take cover. The sprout is still too weak, so let the minitrice be yet.
Gloxinia Pick
In general, before planting in a permanent place, gloxinia seedlings must survive at least 4 picks. And with the obligatory pinching of the central stem. This is necessary for the rapid development of additional lateral roots.
However, there is no exact schedule for when to dive gloxinia sprouts. You need to look at the situation and condition of the seedlings. As soon as you notice that they have stopped developing and growing, immediately dive. Or another moment: the sprouts began to run out of space, they were close and dark nearby. So again the picking procedure.
By the way, gloxinia seedlings are too small. It is very easy to damage them with your fingers. If you are not a microsurgeon or jeweler, then use an ordinary teaspoon to dive. It is very convenient for her to catch gloxinia with a lump of soil.
Seedling Care
Gloxinia seedlings do not require special conditions. It is enough to follow three recommendations:
- Keep track of soil and air humidity inside the container. If necessary, lightly spray with clean boiled water. The temperature is just above room temperature. You can even use melt, not from the street, but from the freezer. Naturally, warmed up.
- When a second true leaflet appears, gradually accustom seedlings to room temperature and humidity. In other words, begin to slowly ventilate the mini-greenhouse and temper the plant.
- The degree of lighting does not change. Maybe they raise the lamps higher so that they warmer seedlings less, but the brightness does not diminish.
If you did everything right, then about two months after germination, gloxinia will have 4-5 true leaves. It is high time to make the last pick and plant the plants for permanent residence.
We plant gloxinia correctly
For a young plant, a pot or cup with a volume of not more than 120 ml is quite enough. The root system is still too weak and small to absorb more soil. And this threatens souring and the appearance of mold.
In such a glass, gloxinia grows beautifully, develops and blooms. Now it can and even needs to be fertilized.
We feed plants
Do not use organics to fertilize gloxinia until a full-grown tuber has developed. It is better to use complex mineral fertilizer, reducing the dosage by three times. A full dose can simply burn a weak root system.
For the same reason, do not make a mix of various top dressings yourself. To go too far is very easy. And with a burnt root, no plant can exist.
Seed gloxinia care
The result of your many days of work depends on competent care. Some sources recommend that seed gloxinia be prevented from blooming in the first year. Allegedly, this weakens the plant. But if you take good care of it, properly fertilize it and water it in time, then what kind of weakening are we talking about?
And if you leave the flower to its mercy, it will bend even without flowering. It is very important to see the flowers in the year of sowing. Otherwise, the plant will not go through its entire vegetation cycle.Normally, gloxinia is going to rest in the fall. The foliage gradually begins to fade, and then the whole aerial part completely dies.
If the plant feels invigorated, but is not going to bloom, then it will not go to rest either. In this case, you have to take good care of gloxinia all winter so that it enters its normal vegetative cycle.
Typically, such "losses" bloom very early in the second year of life, and by autumn they calmly enter their usual course. Be sure to arrange for them additional illumination on short winter days and fertilize them like in summer. Otherwise, gloxinia will get lost in the seasons and may die. Then all your labors will be in vain.
How to store gloxinia in winter
If the plant has successfully grown tuber, then it is advisable not to leave it to winter in the soil for the first year. You need to remove it from the pot, rinse thoroughly and dry. Then you need to put the "teenager" in a dense bag with wet peat or sawdust. Required openings for ventilation and evaporation of condensate.

Next, the bag is placed in a dark, cool place. About once a month, you will need to inspect the contents in order to detect the appearance of rot or mold in time. But, it is entirely possible that your gloxinia will escape such a fate.
Gently push the soil away from the plant stem. Well-developed tuber didn’t get in sight? Then leave gloxinia winter in the pot. Again, we are waiting for the complete death of the aboveground green mass. We cover on top with a dense package with several holes. And we remove into the darkness and coolness.
If the place is too dry, occasionally moisten the soil. But do not flood!
Both variants are well tolerated by young gloxinia. Under normal storage conditions, fresh sprouts of this year should appear in February. From that moment, the pots are brought into the light. And they are looked after as if they were full grown flowers.
Useful Tips
- If, when airing the mini-greenhouse, the gloxinia seedlings begin to wither, then for some time discard this venture. It is possible that the plant is still too weak. Let them grow a little more.
- Do not use peat tablets for sowing gloxinia. The root system of seedlings is too tiny to overpower the entire volume of peat. And this whole thing can safely turn sour. Then you will not help a young seedling.
- Some sources recommend sowing gloxinia in a hydrogel. We do not recommend this. Because you cannot control the moisture level of the substrate. Better add the hydrogel cubes to the soil when planting the sprout in a permanent place. This will help maintain the optimum moisture level in the pot or cup.
- Be sure to use drainage for a pot with a grown flower. Gloxinia loves to drink, but does not want to swim in water at all. But for seedlings, drainage is optional. You are already observing them too closely to overflow.
- The soil for planting for permanent residence is practically no different from the land for sowing. The only difference: a little more peat is added to the pot. It helps the young roots to breathe freely. In addition, the substrate is slightly loosened. This is also a plus.
How to grow gloxinia from seeds? As you can see, this business is rather troublesome, but very exciting. Some homegrown "Michurins" even manage to cross gloxinia on the windowsill and display plants of a unique shape and color. Try it and you put such an experiment. What if it works out?
Video: growing gloxinia from seeds
Submit