The content of the article
There are many jokes about when girls with straight hair want to become happy owners of curly hair, and vice versa. Today, beauty salons offer a chemical wave service that allows you to make curls voluminous and lush for a long period. The technology cannot be called simple, therefore the pricing policy for it is appropriate. Wanting to save a family budget, many ladies seek to do perms on their own.
Precautionary measures
- Before use, carefully study the information for the drug. Make sure the expiration date has not expired.
- In the process of perm, do not use metal tools, they are quickly oxidized.
- It is forbidden to conduct perm during menstruation, as well as during an exacerbation of chronic diseases.
- With care, do a perm along with taking antibiotics, as well as on an empty stomach.
- Before you wind your hair, decide on the length. After the procedure, the hair will be shorter, this fact must be taken into account.
- You can not apply the composition to the scalp if it has wounds, abrasions, purulent acne, dandruff.
Necessary tools and materials
Before starting the procedure, take care of all the tools, materials and devices that may be needed in the process of performing perm. To start, ask your friend for help, you will need an extra pair of hands.
Tools
- foam sponge (2 pcs.);
- elastic bands for fixation of whooping cough;
- plastic gloves;
- hairdresser's cape;
- shower cap or a special warm cap;
- ridge with a sharp edge and sparse teeth;
- hairdressing clips;
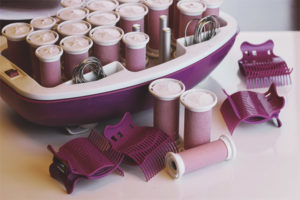
- curlers or whooping cough (diameter 5-22 mm.);
- a syringe without a needle or beaker;
- ceramic or glass bowl (2 pcs.);
- terry towel (2 pcs.);
- napkins;
- jug.
Materials
- chemical perm;
- fixer (fixer) of the final result;
- table vinegar (9%);
- shampoo;
- fat cream or petroleum jelly;
- spray for resuscitation of hair after a perm.
Important!
- In the shop of professional cosmetics and beauty salons, special chemical products for curling are sold. Choose a drug taking into account the peculiarities of hair (fatty, dry, normal). If possible, consult with a specialist before paying money for a particular product.
- The latch serves as a fixer of the final result. You can purchase the mixture immediately with a chemical composition for curling or prepare it yourself. In the second case, get hydroperite, grind 16 tablets into powder, add 35 ml. shampoo. Mix everything thoroughly, pour into a resealable container, apply for half an hour.
Preparation for a perm
- Perform a test to evaluate skin reaction to chemical composition. Put a drop of the composition on the side of the neck or wrist, wait a quarter of an hour, rinse. If you did not notice irritation or itching, feel free to start the perm. Otherwise, choose a more gentle composition that does not cause allergies.
- Girls with dyed hair are advised to conduct a test in order to prevent further changes in the shade of hair. Cut two thin curls on an inconspicuous part of the head. Place the first strand in a curling agent, the second in peroxide (3%). If after half an hour the curls lose their color, it means that a coloring pigment is still present in the hair structure.In this case, you need to wait 3-4 weeks without dyeing your hair during this period.
Perm technology
- Set aside the procedure all day. Wash your hair in the morning, but try not to lather your scalp to maintain subcutaneous fat. It serves as a barrier that will not allow the chemical composition to dry the epidermis and hair. If desired, you can use laundry or tar soap instead of shampoo. The listed products contain alkali, which loosens the top layer of the hair so that the curling mixture penetrates the core.
- After washing your hair, dry the hair with a towel, comb from the ends to the roots with a comb with rare teeth. Also at this stage you can cut the strands if the final hairstyle involves this step. However, it is important to consider that an additional 3-5 cm must be left in order to comply with the estimated length.
- Now divide the hair with the back of the comb (sharp edge) to make thin strands. Take 1 curl, pull it and comb. Attach a papillot or bobbin to the end. Observing an angle of 90 degrees, begin to wind the hair to the roots, while at the same time bending the free edge of the curl in the direction of winding. Perform manipulations with each strand, fix the curlers with elastic bands.
- After the entire pile of hair has been processed, apply a greasy cream (suitable for anti-frost or for children) on the skin of your temples, forehead, neck, area behind the ears, then tie with napkins. Put on a hairdresser's cape, rubber gloves, start breeding the composition.
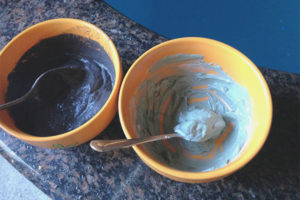
- If you have short hair, about 60 ml will be required. means for a chemical wave. In the case of hair to the shoulder blades - about 120 ml., For long strands - 150-180 ml. Prepare a glass or ceramic bowl, measure the composition with a syringe or beaker, send to the bowl.
- Scoop a little funds on a foam sponge or a brush for coloring, begin to intensively apply on strands curled with bobbins. First of all, the occipital part and the crown are processed, then the whiskey, the hairline on the forehead and side.
- Put a plastic bag, a shower cap, or cling film in several layers on your head. Next, wrap yourself with a terry towel. If desired, you can use a special warming cap, which is sold in stores for hairdressers.
- After applying, leave the mixture on the hair, the exact exposure time is indicated by the manufacturer in the instructions (each one has a different one). In order not to burn your hair or, conversely, not overexposure the composition, clearly follow the recommendations.
- After 20 minutes after applying the drug, make a preliminary examination. Put on gloves, remove the towel and film. Unscrew 4 strands (on the top, back of the head and temples). If the curls are just starting to curl, withstand the maximum period by periodically removing the whooping cough.
- When you achieve the desired result (elastic twisted strands), rinse the chemical with warm water. You do not need to remove hair curlers from the hair. Then pat your head with a bath towel, removing excess fluid.
- Now you can start applying the fixative. The finished product is used as needed, but if you did the fixer yourself, it must be used immediately.
- Beat the latch in a convenient way to get a dense foam. Divide the product into two parts, distribute one of them with a clean sponge over the entire surface of the hair with bobbins.
- The exposure time is 7 minutes. After the specified period, you can remove the curlers, most importantly, carry out the procedure carefully so that the curls do not lose shape. When the curls are released, distribute the second part of the product on them, wait 5 minutes.
- Rinse the strands with slightly warm water, apply a rinse to neutralize the chemical composition. You can prepare the product yourself: dissolve in 4 liters. warm water 130 ml.table vinegar, mix, pour into a jug.
- Next, remember the curls with your hands, gently pat them with a towel to collect water. You cannot blow dry a hairdryer, otherwise the hairstyle will look like a dandelion. Sprinkle the curls with a restoring spray, lay with curlers.
Practical recommendations
- If you have short hair (up to 10-15 cm.), Give preference to small diameter bobbins. Ultimately, you get volume at the roots and lush curls.
- To make waves on long hair, use large diameter plastic curlers.
- To get even curls, divide the hair into strands so that their width matches the length of the bobbin.
- In the process of winding, do not tighten the hair around the bobbin, otherwise the chemical product will not penetrate the lower layers of the hair.
- Fix curlers with rubber braids for African braids. At the same time, wear them crosswise or parallel to ensure uniform fixation.
- The width of the hair in a wound state should not exceed a mark of 0.5 cm. Make sure that the indicator is equal on each bobbin.
- To do a perm on very short hair, use hairdresser clips to fully fix the curlers.
Hair Care After Perm
- When you do a perm, give up the staining procedure for 1-2 months. If you neglect the advice, the pigment will not adhere well to the hair structure, being washed away by spots after each rinsing.
- After curling, wear your hair loose or braid it in a tight tail. Do not use metal hair clips and elastic bands that disrupt the styling and weaken curls.
- Within 3 days after the procedure, the hair will smell like ammonia, nothing can be done about it. You can not wash the hair during the specified period, otherwise the composition will be washed out of the structure and the curls will partially disintegrate.
- Owners of chemically curled hair are not allowed to use the straightener and curling irons. It is not recommended to blow dry your hair so as not to disturb the styling.
- Do not comb wet strands, gently pat them with a towel, then dry naturally. Do not go to bed until the hair is completely dry.
- For 24 hours after curling, do not comb your hair with a massage brush. Use a flat scallop with teeth located at a distance of 0.2-0.4 cm from each other. Crush curls with your hands to keep curls in their original form.
- Beauty salons and professional cosmetics stores sell hair care products with permed hair. Use only such products, they will not allow the curls to weaken.
If you follow the step-by-step instructions and clearly follow the recommendations, you can easily perms at home. Choose a professional chemical composition, prepare a fixative, choose the optimal diameter of whooping cough. Follow the rules for hair care after the procedure.
Video: Perm and hair bi-curling

Submit