The content of the article
What flooring has high thermal insulation properties and wear resistance? Linoleum. The budget material is resistant to the wet microclimate of the kitchen and bathroom, fits into the interior of the bedroom, living room and nursery. The disadvantage of the coating is that it repeats all the depressions and pits of the base, therefore, before laying linoleum, the concrete surface is carefully leveled.
Preparatory stage
From the room in which it is necessary to make repairs, all night tables, cabinets, armchairs and other items are carried out. They tear down the old flooring, take out construction waste and sweep away the dust. It is important that the concrete base is perfectly clean. No dirt and extra tools.
First, they deal with the floor itself: close the cracks, lay a layer of waterproofing material so that the neighbors from below do not complain about the damaged ceiling. Usually choose:
- bitumen paper;
- roofing material;
- dense plastic wrap;
- polymer membranes.
Before laying the waterproofing coating, the concrete base is treated with a primer. Then covered with sheets of paper or film. If you use not one but several layers, the thermal insulation characteristics of the floor will increase. The material is overlapped, carefully gluing the joints with construction tape.
The second step is to determine the angle of inclination of the concrete base. If it does not exceed 3 cm, the thickness of the screed varies from 7 to 9 cm. Surfaces in which the difference between the highest and lowest points is more than 4 cm is first leveled with special laying. Then you can use a dry or wet screed.
How to determine the angle
- Put the ruler perpendicular to the floor and, retreating exactly 1 m, make a mark. Screw a screw into the wall or drive a not too thick nail.
- Using the building level, mark the entire perimeter of the room. Stretch tight threads or twine between the screws.
- Calculate the difference between the highest and lowest points. Mark level zero.
Screw the self-tapping screws at a distance of 10–20 cm into the concrete base. Check with a building level that their hats are parallel to the floor. Lighthouses are placed on the screws. To level the concrete floor, it is recommended to use metal T- or U-shaped options.
Mounting self-tapping screws for lighthouses will be easier if you use laser levels or levels. They make more accurate calculations, so the concrete base for the laminate will be perfectly smooth.
Dry fill
Carefully smooth the waterproofing film, removing all folds and bumps. Glue the room around the perimeter with damper tape, arrange the beacons.
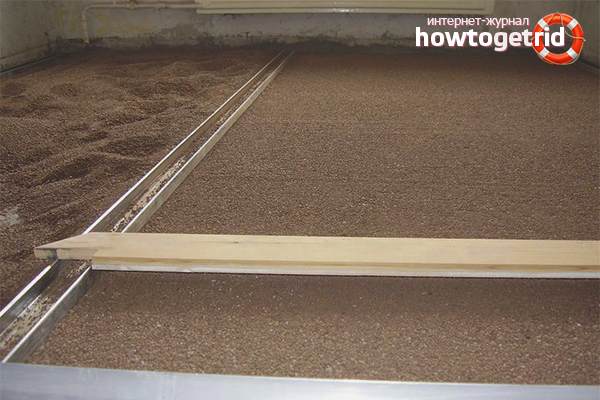
To fill up a concrete surface with small expanded clay. Carefully level the material, focusing on the levels. Tamp the base well, leaving room for the gypsum sheets. The expanded clay layer is about 10 cm thick.
Gypsum-fiber sheets with a moisture-resistant coating or plywood boards are laid on a dry backfill after a day, carefully smearing the edges with construction glue so that the joints fit snugly together. It is recommended to use 2 layers of material. The sheets are fastened together by screws, which are screwed along the connection line. Observe a distance of 40-50 mm.
Joints and caps of self-tapping screws should be puttyed. Coat the cracks between the plates, and after drying, remove the rest of the paste with sandpaper or a grinder to level the surface. Trim the ends of the waterproofing material that protrude above the plywood boards.
A dry screed is more expensive than a wet variety, but it saves time.Linoleum is laid immediately after the putty dries. The expanded clay layer makes the floors warmer, and the neighbors below stop complaining about the noise.
It is not recommended to use this type of screed in apartments with low ceilings. It reduces the height of the walls and makes the room cramped and uncomfortable.
Silica sand or polystyrene foam is also used as a dry backfill. Material after tamping with a roller is left for a day for shrinkage, so that it fills all the voids. If necessary, add some sand or expanded clay.
Wet fill
Wet pouring technology is practically no different from the dry variety. After processing cracks and pits, a waterproofing film is laid, gluing the joints with tape. A heat-insulating tape is glued to the walls around the perimeter, self-tapping screws are mounted and beacons are installed.
In a concrete mixer, 1 part of cement is combined with 1 part of water and 3 parts of sand. Sometimes small expanded clay or crushed glass is added, but this is not necessary. For the preparation of cement at home, you will need a large iron bath or other durable container. The components are poured into it, and then thoroughly knead with a spatula or hands. It is possible and feet, putting on clean rubber boots.
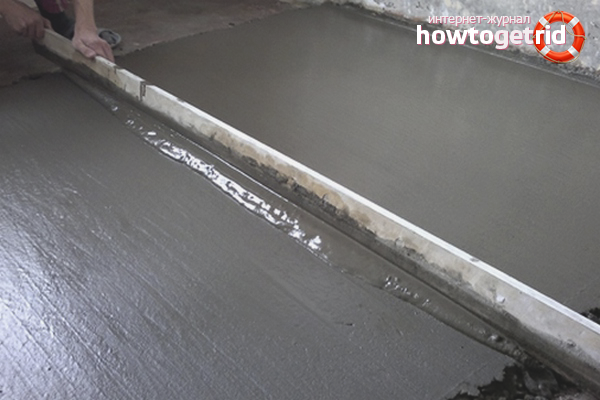
Liquid cement is poured onto a waterproofing film coated with a mesh of beacons. They are leveled with a spatula, and then they are passed along the surface with a needle roller to squeeze out air from the lower layer. Leave the solution for a day to dry.
After 1-2 days, when the cement mixture hardens, the beacons are carefully pulled out. The grooves remaining after them are filled with the same composition. Flatten, remove excess residue with a spatula. Grout the screed. Apply a thin layer and spread over the entire cement base to make it perfectly smooth.
Concrete pouring dries up 28-30 days. During this period, no one should enter the room so that there are no dents or other traces left. The linoleum base is periodically wetted with water so that it does not crack. First abundantly watered with liquid, and then covered with plastic wrap to retain moisture in the concrete layer.
Are you going to lay insulation on top of the wet screed? Then it is recommended not to wait until the cement mixture has completely dried. It is desirable that the thickness of the wet layer is 3-4 cm.
If insulation is not needed, linoleum is recommended to lay on a dry concrete base, which is pre-treated with a primer. You can not save on this tool, because the durability of the floor covering depends on its quality.
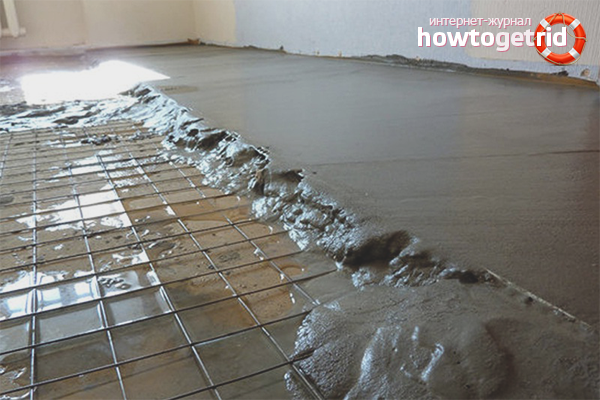
A wet screed will be stronger if a reinforced mesh is laid on the waterproofing film before pouring the cementitious compound. The sheets are fastened with a dense wire so that they remain motionless.
Wet screed is used in apartments with low ceilings. Concrete substrates normally carry moisture, unlike wood and gypsum boards. They are more stable and reliable.
Semi-dry screed
Cracks are closed, the floor is cleared of debris, and beacons are installed. It remains to prepare a solution that differs from the composition intended for wet screed. You will need:
- part of cement, preferably brand M400;
- 600-800 g of fiber per 1 cubic meter m. ready solution;
- 3 parts sifted sand;
- plasticizer at the rate of: 1 liter of substance per 100 kg of dry cement.
Knead mass until smooth. It will turn out thick and slightly viscous. Stack in small portions, leveling with special movements. First pull the tool towards you, then right to left. The solution should completely cover the beacons, they are left inside and do not take out after drying the screed.
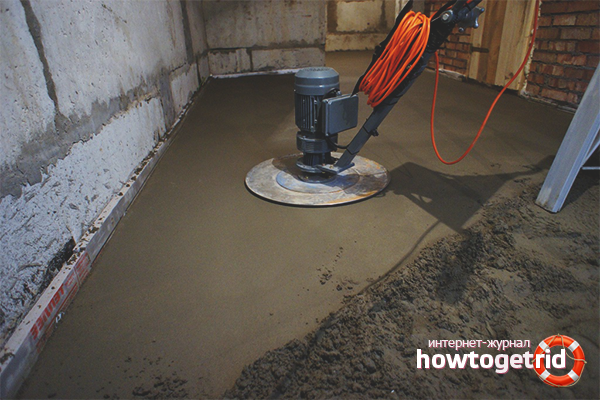
After 20 minutes after laying, the concrete layer is wiped using a grinder. The mixture is prepared from the same sand-cement mass, which is diluted with tap water to a liquid consistency.The grout is leveled with a wide spatula, and then treated with a needle roller, so that no air bubbles remain inside.
The thickness of the new concrete layer varies from 3 mm to 4 cm, depending on the angle of inclination. The floor is poured with water before laying the cement mass to prevent cracking. You need to work quickly, preferably together with someone, because a semi-dry screed quickly freezes.
Immediately before laying linoleum, the concrete base is smoothed with a grinder, removing roughness and unevenness.
Semi-dry screed, like wet, dries for at least 30 days. In the first week it is regularly watered with water and covered with plastic oilcloth so that no cracks appear on the surface. The final stage is the application of a primer, on top of which linoleum is laid.
Aligning concrete floors is a complex and time-consuming job. Beginners who are not self-confident are encouraged to invite more experienced comrades. They will tell you how to properly knead the solution and put the beacons, help to level and grind the screed. And people far from repair are advised to turn to professionals to save not only money, but also nerve cells.
Video: how to level the floor under linoleum and laminate

Submit