The content of the article
Sun-dried fish fell in love with many people for its dense texture and relative ease of cooking. Experienced housewives prefer to process carcasses in such a way as to increase the duration of storage. It is known that store products are crammed with stabilizers and preservatives, so it can hardly be called completely natural. It makes sense to consider the procedure for drying fish at home, which we will talk about today. This case has its own particularities regarding the choice of raw materials and their preparation for further manipulations.
The right choice of fish for drying
Many housewives are faced with the question: “Which fish to choose?”, And this is not surprising. The variety of varieties is impressive, but not all of them are suitable for processing in this way.
- Lovers of dried products claim that you can use both fresh and frozen raw materials. In this case, the latter option is suitable only after complete thawing at room temperature.
- Experienced housewives brought their own varieties of fish, the most suitable for drying at home. These include Argentina, capelin, crucian carp (sea), perch, halibut, flounder, herring, herring, sprat, sardine, mackerel, croaker, sprat, horse mackerel, croaker.
- Other varieties are also suitable, such as hake, roach, ram, carp, bream, roach, sabrefish, shemai, ide, chub, sop, etc. However, these types of fish cannot fully convey the taste of the dried product.
- It is important to remember forever that of all the names mentioned, special attention is paid to sardine, herring, flounder, horse mackerel, kilka, halibut and herring. They cannot be harvested in large quantities, since the consistency itself quickly disappears. The listed varieties after processing are stored for about 3 weeks in the refrigerator and not longer than 4 days at room temperature. However, other breeds are stored for up to six months in the refrigerator and about 3 months at room temperature.
- If we talk about the weight category, the mass of the carcass should not exceed the mark of 1 kg. It is important to assess the smell of fish, the product should not smell like antibiotics, oil or other harmful substances. Evaluate the walls of the abdomen, they should not bend inward (after pressing the body of the fresh carcass returns to its original position).
Preparation of fish for drying
- A distinctive feature of the preparation of fish using this technology is that the carcass does not need to be cleaned or gutted. The main thing is to choose a fresh, suitable catch size, and then salt and dry it properly.
- During the drying process, the flesh absorbs adipose tissue located under the scales. This move gives the finished product a tender and pleasant aftertaste. Many are interested in the question of whether there are differences between the drying technology in the summer and winter. There are no serious aspects, but there are basic features.
- In summer, it is recommended to monitor sanitation and prevent insects from entering the carcass cavity. In the warm season, experienced housewives prefer to gut the fish so that the open abdomen can be seen clearly. Also in the summer, the fish eats algae, giving the final product bitterness.
- To prepare the fish for drying in the summer, make a solution of table vinegar and water (1: 5 ratio). Gut the carcass, rinse it under the tap (cold water), leave to soak for a quarter of an hour. After the expiration, let the liquid drain. In winter, it is not necessary to cut raw materials; it is enough to wash the fish and dry it with paper towels.
- To ensure uniform salting of the pulp of a large carcass, cut it along the ridge and spread it in one plane.Some housewives prefer to chop fish with steaks, it all depends on personal preferences.
Technology of dried fish
The cooking process is not particularly difficult and includes the main stages. First, salting and soaking the fish is carried out, then the carcass is dried in a place with good circulation and relative humidity. Consider each step in more detail, highlight the main thing.
Stage number 1. Salted fish
Recipe 1. Rinse the carcass thoroughly with water, transfer to a dish and refrigerate for 2 hours. At the end of the term, prepare a deep container, lay the carcasses in one row, evenly distributing the fish along the bottom of the tank. Sprinkle the raw material with copious amounts of table salt. So that the final product is tasty and rich, you can not save on salt.
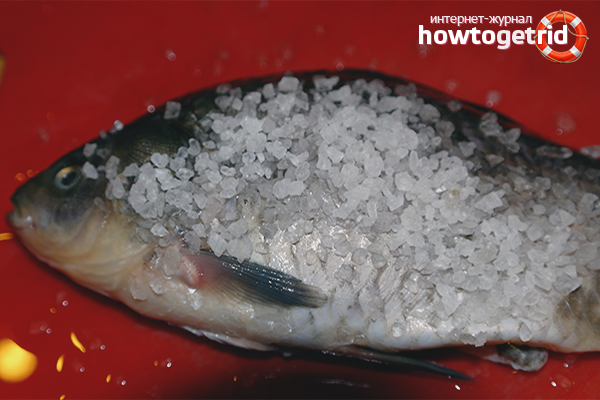
Following the first row of fish, the second comes, the manipulations are repeated until all the containers are filled with salted carcasses. Leave the container at room temperature until juice appears.
Many believe that an excessive amount of salt will adversely affect the result, but this statement is extremely erroneous. The main failure of novice housewives lies in the fact that they add little salt. In this case, the dish turns out tasteless.
After a certain period of time, you will notice that the fish gave away the juice. It is this feature that characterizes the onset of salting. After that, move the container into the refrigerator for 5-6 days.
Recipe 2. There is another recipe for pre-salting in a liquid. To do this, wash the carcasses, dry them with paper towels / towels, and rub each fish with a lot of sodium chloride.
Put the raw materials in a deep container, fill with a solution of room temperature, put under a press. To prepare the brine, mix 120 gr. salt and 480 ml. filtered water, bring to the dissolution of crystals.
Determining a sufficient amount of salt is simple: remove one carcass, send it to a container with fresh water. If the fish has surfaced, proceed with the following procedures.
(drying). In cases where the product sinks, it contains too much salt. Soak the raw material in plain water until the excess ingredient is “washed out”.
Stage number 2. Drying process
- To get started, prepare the necessary inventory. You will need a strong thread (twine), a fish will be strung on it. You will need a wooden box and gauze, which will prevent the ingress of insects and ensure the flow of air.
- After salting, place the carcasses on parchment paper or album sheets for partial drying. Then proceed to stringing, armed with a needle and thread. Pass the gypsy needle through the eye holes of the fish, directing the backs of the carcasses in one direction.
- It is important to string "raw materials" in such a way that the bodies do not touch each other. If we talk about the number of carcasses on a bunch, it should not exceed the mark of 15 goals (small samples). Regarding larger specimens, their number is usually 5-6 pieces.
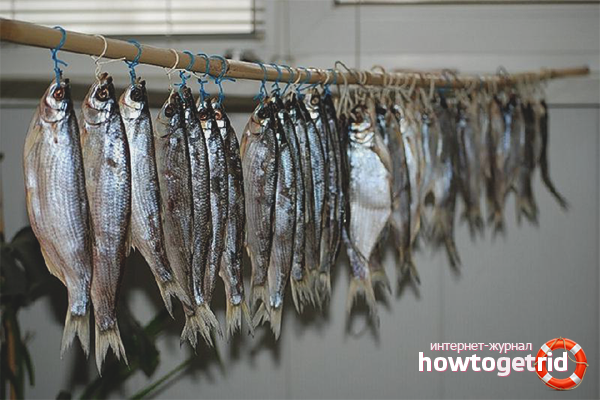
- Proper drying of the fish is carried out in the fresh air (in summer) and in the kitchen (in winter). A box will be needed to dry carcasses in the warm season, you can put it on the loggia or balcony, covering the fish with gauze. If it’s cold outside, hang the bundles near a gas or electric stove.
- The duration of the procedure varies depending on the size of the carcasses. To prepare a large fish, you will need about 3-4 weeks. In the case of small specimens, the drying process takes 15-20 days.
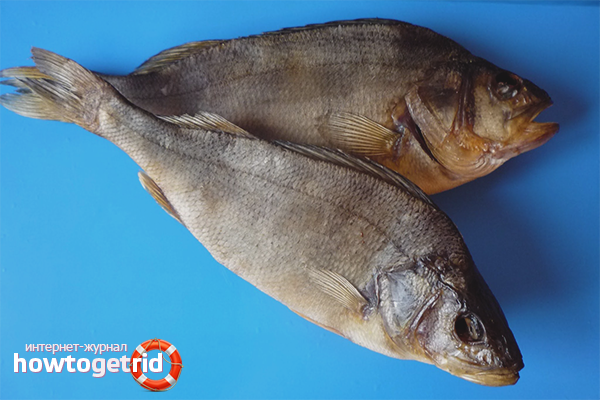
- Appearance will tell you about the readiness of the product. There should be no salt residue on the surface of the carcass, while the fat comes out. Also, the “dead” carcass does not have dry meat, its skeleton is visible under a daylight.
- If the fish meets the above requirements, remove it from the string and wrap it with parchment paper. Send to the bottom shelf of the refrigerator for final ripening.The exposure time in this case is 20 days.
Practical tips
- The most delicious are those types of fish that have a wide layer of fat. For this reason, it is recommended to conduct a careful selection before proceeding to dry.
- To eliminate the unpleasant smell of silt immediately after fishing, put all the carcasses in a deep bucket or container. Place fresh nettle branches inside, leave for 30–45 minutes in a cool place.
- In the process of gutting large individuals, remove only the gills and intestines, leave the rest unchanged. As mentioned earlier, actions are carried out in summer or optionally in winter.
- If drying is carried out in the warm season, vegetable oil will help scare away insects. Lubricate the surface of the carcass with it and leave until completely absorbed. Acetic solution (100 ml of the composition per 1.3 liters of drinking water) acts in a similar way.
- The optimal level of humidity is considered an indicator in the range of 70-80%. At the same time, choose a dark room with sufficient air circulation to dry the fish.
- Wasps and flies fly only on fresh, recently hung fish for drying. To avoid such consequences, send twine with carcasses to the balcony in the late evening, in the morning the composition will catch up with the crust.
- To carry out accelerated drying, open the belly of the carcass, gut the fish. Fix it in the open state with matches (remove heads first) or with toothpicks.
The process of drying fish at home has a number of features that are important to consider. Choose carcasses with a large layer of fat under the scales. In the summer, dry the product under gauze, lubricating the surface with vegetable oil or vinegar. Consider dry and wet methods of pre-salting, choose the appropriate option for yourself.
Video: how to properly fish


Submit