The content of the article
During the harvest period, every housewife wants to stock up on fruits for the future. Particularly popular is the billet drying, which is subjected to pears. Later, when the cold comes, on the basis of dried fruits you can cook stewed fruits and various goodies. Therefore, drying should be carried out correctly, in case of violation of technology pears will lose most of the nutrients. Today we will consider the main methods of harvesting.
Preparation of pears for drying
- The fruits should be stiff, and their skin should be moderately thick. For drying, do not choose too soft or overripe pears. Pay attention to the number of seeds, the fewer the better.
- As for varieties that are suitable for heat treatment, there are many. Give preference to "Forest Beauty", "Victoria", "Limonka", "Aromatic", "Ilyinka", "Bergamot", "Zaporizhzhya".
- It is strongly not recommended to dry frozen, damaged, wormy, rotted fruits. When drying, the main thing is the integrity and density of the fruit.
- If it seems to you that the pear looks suitable for drying, but has some bruises, cut them out. After sorting and discarding excess, thoroughly rinse and dry the raw materials.
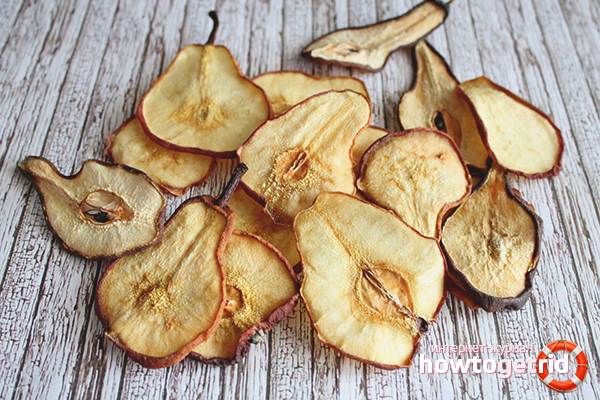
- If the pears are relatively small in size, they can be dried whole or cut into 2 parts. Larger specimens are better chopped into 1 cm slices. Do not forget to remove the seeds.
- Some housewives have developed an effective method for preparing pears for drying. Dip the fruits in boiling water for a couple of minutes, cool, then chop and peel the seeds. So in fruits the maximum of vitamins remains.
Method number 1. Natural way
- First, select a place that will meet the requirements for drying pears. It is important to carry out the procedure in sunlight, the absence of dust and wind, midges, insects.
- Prepare the pears as described above. Then put the pieces of fruit on a wire rack, plastic tray or baking sheet. Put the contents in the place that is best lit throughout the day.
- First keep the fruit in the sun for several days. Cover the contents with gauze at night and bring them into the house. Put the pear tray in the morning again for further drying.
- When the fruits are slightly dry, bring them into a room with dry air and bring to readiness. In this state, the pears should dry for another 3-4 days.
- For the pieces to dry evenly, periodically turn them from one side to the other. Before storing the contents for storage, make sure that all pears are completely dry. Otherwise, mold will develop.
- If the option of carrying out the procedure on a tray is not suitable for you, pierce the slices of pears with a needle and thread the thread. Hang in a place inaccessible to insects. Dry until tender. Then put it in linen bags or glass jars.
Method number 2. Oven
- Due to modern technology, many housewives have switched from drying by the natural method to the use of an oven. The procedure will take less time and give an excellent result. In addition, weather conditions do not always allow drying pears on the loggia or roof of the house.
- First, warm the oven to 55-60 degrees, then spread the slices of pears on a baking sheet. Send to the oven, wait 2 hours. After this period, increase the power to 80 degrees. Wait for the moment when the pears will decrease in size.
- After that, again reduce the oven power to 55 degrees, continue languishing. Next, note the time. If you dry the pears with slices, wait 13-15 hours.When processing whole specimens, it takes about 20-22 hours. Allow the fruit to cool completely before sorting for long-term storage.
Method number 3. Microwave
- This method is considered the fastest. If you do not want to wait, use the microwave. Using this appliance, a portion of pears will dry in 3-5 minutes.
- Nevertheless, despite the speed, not all housewives love this drying method. Since if you do not inspect, you run the risk of getting hard "coals" instead of beautiful dried fruits.
- Take a flat dish that is suitable for use in the microwave. Cover it with a cotton cloth or parchment paper. Spread washed and prepared pieces of fruit on a platter.
- Set the microwave to 200-250 watts, note the time. It will take you 2.5 minutes to get started. If this is not enough, increase the duration a bit later. So, send the pears to dry.
- After the allotted time, check the fruits. When pressed, they should spring, this indicates the elasticity of the pears. If the fruits are stiff, this indicates that they are not ripe.
Method number 4. Air grill
- If you have an air grill, it makes sense to use it. Prepare the appliance, place the pieces of fruit on pallets in one row. Set the temperature mode to 65 degrees, turn on the fan to maximum.
- Drying is carried out in 2-3 stages of 25-30 minutes. Between procedures, leave the fruit to cool, then start the device again. Do not forget to shift and turn over pears for uniform processing.
- In just a day you need to do 6 approaches in 3 stages. After about 28-30 hours, the pears will be completely dried. You just have to cool them and put them in storage.
Method number 5. Electric dryer
- The electric dryer is designed specifically for preparing dried fruits for the winter. Assemble the appliance, place the pieces of fruit in one layer on its trays. Turn on the temperature of 70 degrees, press "Start".
- Periodically, workpieces need to be turned over for uniform heat treatment. The drying time in the device is approximately 17-19 hours.
- Do not leave the electric dryer unattended so that the pears do not dry out. Turn off the appliance when the fruit has a beautiful brownish color.
- Properly dried pears do not crumble. They have elasticity and density. After all the manipulations, leave the slices to cool at room temperature.
The subtleties of drying wild pears

- Heat treatment can be subjected not only to pears grown in summer cottages. If you have the opportunity to collect the game, use it. The result is tasty and healthy dried fruit.
- You need to know that wild pears do not need to be picked from trees. A scavenger is suitable for drying. After harvest, put the fruits in a box or box, expect the fruits to darken.
- When the pears have settled down, wash them and cut them into slices. You can chop the fruits into 2 parts, proceed with personal preferences. It is not necessary to cut the seeds, nor should the pear be blanched.
- After preparation, use one of the above methods of drying pears. In the end, you should get not hard, but elastic and dense dried fruits.
How to store dried pears
- After drying, you must select the method of proper storage. After all, if the safety conditions are violated, dried fruits may become moldy or harden.
- The shelf life of dried fruits does not exceed 12 months. After the allotted time, it is necessary to get rid of dried fruits and prepare a new portion.
- Choose a place where it will be dark and dry. A glass dry jar with a sealed lid, as well as linen (cotton) bags, are suitable as a storage vessel.
- Do not keep pears near radiators, a gas or electric stove.Otherwise, condensation may appear in the pear container, which will lead to spoilage.
- To be sure of the integrity and usefulness of the fruit, periodically open the jars with the contents and check the dried fruits for mold, bugs, insect larvae, fruit moths.
- It is worth remembering that too long storage makes the pears hard and dark. Therefore, try to eat the fruits as early as possible. If you allow stiffness, heat dried fruit on a baking sheet in the oven. Place a container of water at the bottom to form steam.
- Experienced housewives have found application even to too hard dry pears. Therefore, do not rush to get rid of them. Grind the fruits in a blender or coffee grinder, mix with sour cream and make a body / face scrub.
If you have definitely decided to provide your family with dried fruits for the winter, approach responsibly to the selection and proper preparation of pears for further drying. Choose the heat treatment option based on the devices that are at hand.
Video: how to dry apples and pears


Submit