The content of the article
The bathroom is decorated with ceramic tiles, because it is resistant to moisture and temperature extremes. Facing material is easily washed away from traces of toothpaste and shower gel. But once the owners of the apartment decide to update the decor of the bathroom and start from the walls. And then you have to look for the answer to the question of how to quickly and inexpensively remove ceramic tiles.
Room preparation
The dismantling of the facing material is a difficult and dusty job. Pieces of tile fall on the floor and surrounding objects, can damage the toilet or sink. The bathroom is carefully prepared for repair:
- take out a washing machine;
- remove cabinets and mirrors;
- hang windows with oilcloth or old rags;
- carefully dismantle the plumbing.
If you failed to remove the toilet or sink, they are covered with an old blanket. Wrap a protective blanket around the product, and fasten the corners with clothespins or scotch tape. The fabric and layer of cotton softens the blows, so the plumbing will remain unscathed.
Lay a layer of plastic film on the floor, cover with newspapers on top. Paper prevents slipping and protects against household injuries. On the baseboard paste construction tape. Thoroughly fasten the joints of the film so that dirt and dust do not settle on the floor.
Complete removal
It is easier to dismantle the tile if you do not need to take care of its safety. First, grout is removed from the walls:
- The sponge is moistened in soapy water or a special solution.
- Saturate the seams with liquid and wait until they soften.
- Remove loose grout with a spatula, kitchen knife or chisel.
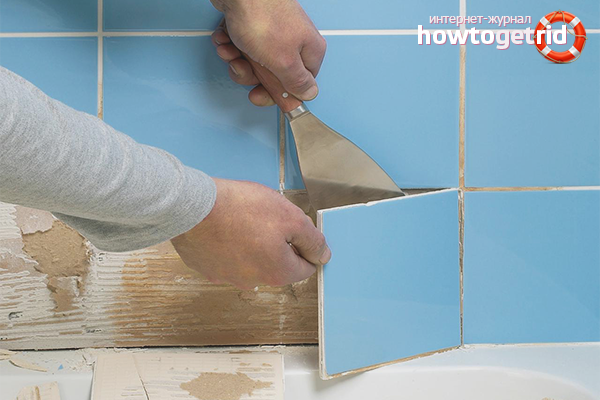
The tile is gently tapped with a wooden stick or handle to find areas with voids. It is good if there are pieces that are independently behind the concrete base. With them begins the dismantling of the tile. You will need a stepladder, a spatula with a wide pointed blade and a hammer. Tools can be replaced with an ax or drill.
Start from the top row. A spatula or ax blade is inserted into the gap between the ceiling and a piece of tile at an angle of 45-60 degrees. Hit the handle or wide base with a hammer. Do this carefully so as not to damage the wall. When the two-thirds of the blade enters the cement mortar or glue, press the ax or trowel with your hands, separating the facing material from the brick or concrete base. One or several pieces fall off. Dismantling the rest will be easier.
Ceramic coating attached to the wall using tile or mounting glue is pre-soaked. Seams are treated with a grinder or scrapers. After removing the grout, a stream of hot water is sent to the facing material. After 30 minutes, when the base softens, the first tile is chipped with a chisel and hammer.
The remains of the ceramic coating are stacked in thick plastic bags. Damaged tiles are separated from the whole. The latter can be used to decorate a summer house or garage. After each cleaned wall, it is recommended to sweep away construction waste so as not to trample it on the floor and not to smash it throughout the apartment.
Dismantling of old tiles is carried out in the afternoon, so as not to disturb neighbors. Carefully remove the tile, which closes the water pipes and electrical wiring. A chisel can damage communications, causing a short circuit or flood.
When removing the tiles, the following precautions must be observed:
- Do not stand under the tile to be removed. A piece of cladding material may abruptly come off the wall and fall on your head.
- Wear a long-sleeved suit, coarse cloth pants, and boots with non-slip soles.
- Protect eyes from dust and tile fragments with glasses.
- Use a respirator or wet gauze to prevent particles of dirt from entering the airways.
- It is advisable to put a helmet or hat on your head that will soften the blow if a piece of ceramic tile falls on the worker.
Partial deletion
To remove a small area of the facing material, on which there are cracks or chips, a drill and a chisel will help. A regular ruler and pencil will come in handy. The work is divided into several stages:
- On the tile, two diagonals are drawn that extend from adjacent corners and intersect in the center.
- The lines are divided into several small segments and put bold points. In a similar way mark the center.
- Soak and remove the old grout.
- Then drill a hole in the marked areas of the tile.
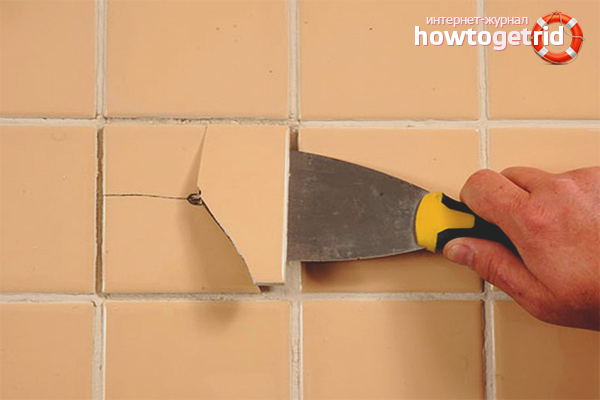
- They put a chisel to the center and hit it several times with a hammer.
- The facing material breaks into 4-8 parts.
- Pieces are forged with a thin sharp blade and removed from the wall.
- The concrete base is peeled, plastered and a new tile is glued.
The ceramic coating, which is attached to the wall with construction glue, is hit several times with a rubber hammer. The tool creates vibrations due to which the tile is independently separated from the concrete base. It remains only to pry it off with a chisel and carefully remove it. It is not hard to hit brittle material so that cracks do not appear. You do not have to use a drill, and the tile remains intact. In order not to damage areas that can not be dismantled, it is recommended to wrap the chisel in a rag.
Drywall Work
The walls in some apartments and houses are insulated with plasterboard plates, on top of which ceramic cladding is glued. Such a base has to be removed along with the tile. It will turn out to remove the tile and not damage the sheets, if before the repair the insulation was covered with a layer of plaster. In such cases, grout is cleaned with a kitchen knife. If the material could not be removed, a grinder makes incisions along the seam line. Mortar or mortar is soaked in soapy water. The tile is pounded with a chisel and removed.
It is easier to crush it with a chisel or puncher, and then clean off the rest with a spatula. Cladding material is peeled off the wall with a layer of plaster. Before gluing a new tile, plasterboard sheets are primed and treated with special leveling compounds.
If the tile was glued directly to the insulation, it will not work to save the base. The cladding layer is removed along with plasterboard panels.
You can remove several pieces of tile glued to the insulation with a hacksaw. Grout around the area to be dismantled, clean off with a thin blade and a sharp tip. A piece of drywall is cut out together with the facing material and, prying off with a chisel, they are removed.
The hole that was formed after the dismantling of the tile is filled with bars or profile. A new piece of drywall is attached to the base. It is recommended to use self-tapping screws, and a bevel is made on the insulation.
Important: If the tile to be removed is located above the bathroom, the plumbing is covered with a shield from boards or chipboard. A metal sheet will do. Can be covered with an old blanket or blanket to protect against damage.
Tile dismantling can be carried out independently if you have the necessary tools at hand. A person who removes the facing material will need a chisel and drill, as well as protective clothing, a respirator and glasses. After all, you need to protect not only plumbing, but also your own health.
Video: how to remove old tiles from the wall

Submit