The content of the article
Indoor orchids reproduce only in a vegetative way. The seeds of flowers growing in pots are small and lack a protective shell. Planting material sprouts in sterile laboratory conditions, and dies when it enters ordinary soil. Orchids are propagated by cuttings and rooting of aerial children, as well as division of an adult bush. How successful the attempt will be depends on the age of the plant and the experience of the gardener.
When to propagate
Cuttings and dividing are carried out in early spring, when the orchid awakens and begins to actively grow green mass. The flower intensively absorbs nutrients from the soil, so transplanting into a new pot will not become stressful for the plant, and cuts will be delayed in 2–4 days.
Adult orchids, which are 3-4 years old, breed. Shoots and cuttings are cut off from healthy specimens, otherwise both the mother bush and the green harvest will be lost.
When working with exotic flowers, wear gloves and disinfect all tools so as not to infect the plant. Use well sharpened scissors. Wash the blade with a strong solution of potassium permanganate, wipe with alcohol or an antiseptic. Keep charcoal with which slices are sprinkled on hand. The powder protects the open "wound" from bacteria and insects.
Side shoot option
Phalaenopsis orchids do not tolerate division. It is safer to propagate this species with side shoots called aerial kids. Preparing an orchid for propagation occurs in two stages. Suitable flower stalk age 1-1.5 years. When he drops the last petals, you should cut off the upper part, leaving only the lower half with a sleeping kidney.
The first stage begins in February or March:
- Watering orchids is reduced to 1 time in 10 days.
- A pot with an exotic flower is transferred to a darkened room, where the night temperature ranges from + 16–18, and during the day rises from +22 to +24.
- The plant is daily taken out in the sun and left for 50-60 minutes, but no longer.
Poor watering and high temperatures awaken the kidney. When she wakes up, the second stage begins:
- The orchid is moved to a warm room, where the temperature is kept within + 20-25 degrees. It is impossible below, otherwise the formation of side shoots will stop.
- Exotic bush protect from direct sunlight. Hang curtains or blinds on the windows, keep the pot in the shade.
- The flower is watered from 2 to 4-5 times a week. A lack of moisture slows the development of children, and an excess leads to the appearance of fungus.
- Defend water for 2-3 days and be sure to warm it up to + 30–34 degrees before watering.
- Regularly feed with fertilizers that contain a lot of nitrogen.
- Spray the top and leaves from the spray gun 2-3 times a day. In water add special complexes for feeding orchids.
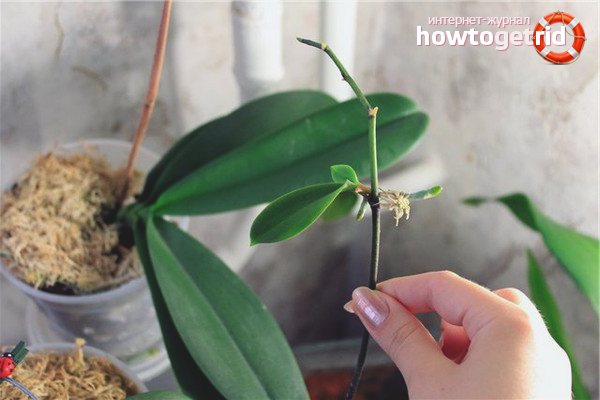
On the flower, which turned out to be in the impromptu tropics, side shoots will appear, in which their own roots and leaves will form over time. Mini bushes are located on the peduncle in place of the buds. Young bushes actively develop at temperatures from +25 degrees and high humidity.
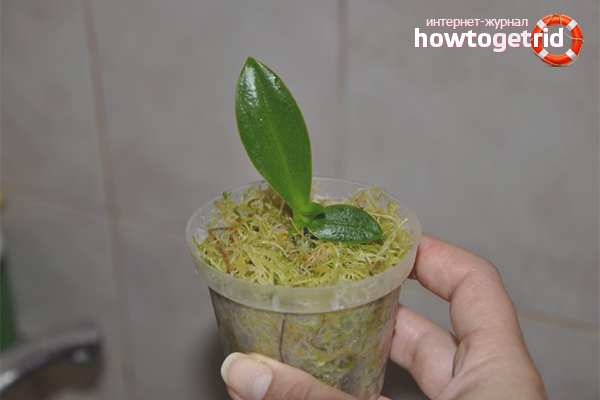
Children are cut from the mother's stem when the roots become 4–5 cm long. Young orchids are transplanted into transparent pots. The capacity is half filled with pine bark with a diameter of 5 mm to 1 cm. It acts as a drainage layer and retains moisture so that the root system of the plant does not dry out.
Pour the substrate over the pine bark. Take the earth from the pot in which the mother orchid grows.Plant young shoots in the ground, water and periodically fertilize. Make sure that the room temperature does not fall below + 25–26 degrees. In the first year of life, it is advisable to keep new orchids in a mini-greenhouse with eighty percent humidity.
Tip: Sometimes on airborne children form their own peduncles. Lateral shoots with buds that are not budding are not cut, but wait until they wither, and only then they separate the young orchid from the mother stem.
Propagation by cuttings
Monopodial species, which include Wanda, Epidendrum and Dendrobium, are propagated by cuttings. The procedure is carried out in the spring, so that the plant has time to adapt and gain strength for rooting:
- Use a sharp knife to separate the tip of the lateral shoot or old elongated stem. At least 2 live aerial roots should remain on the handle.
- Sprinkle slices with charcoal, then treat with fungicides to prevent diseases and cover with garden varieties, which will accelerate healing.
- Immediately plant the cuttings in a separate pot and put in a greenhouse.
Long faded stems can be cut into several parts, leaving 2 axillary buds on each. Put the blanks on moistened sand or sphagnum moss without deepening into the substrate. Cover future orchids with glass. An improvised greenhouse with a high level of humidity will turn out. Keep the box with the workpiece warm. The length of the cuttings varies from 10 to 15 cm.
When the first white roots appear on the blanks, each seedling is placed in a separate plastic glass filled with water. If you leave the cuttings in one container, they will be intertwined. Fragile shoots are difficult to separate without breaking, so most of the seedlings will be spoiled.
Water in plastic cups is changed after 1-2 days so that it does not stagnate. A drop of fertilizer for orchids is added to a new portion of the liquid. Slowly developing shoots are treated with hormone paste or a solution designed specifically for exotic flowers.
How to apply a stimulant? Cut off the sheet next to the kidney, and then grease the remaining stump with a small amount of paste. Repeat the procedure with hormones after 5-10 days.
Plastic cups with cuttings must be covered with plastic bags to create a greenhouse effect. When the roots of the blanks grow by 4-5 cm, the young orchid is planted in a pot of earth and taken care of as an adult flower. The only difference between seedlings and the mother bush is that they do not tolerate direct sunlight and develop more actively in the shade.
Division of an adult plant
Reproduction by the division method is carried out carefully, choosing only the strongest and most healthy flowers. This method is suitable only for sympodial species:
- Miltonia;
- Oncidium;
- Cymbidium;
- Odontoglossum;
- Dendrobium;
- Cattleya.
Only an adult flower with a minimum of four false bulbs will do. With a smaller amount, the plant does not have time to develop the root system, becomes weak and dies. The orchid is divided into 2, maximum 3 parts. The division is recommended to be carried out when the pot becomes too close for the root system of an adult bush, and the plant will need to be transplanted into a new larger pot. There is nothing complicated in such reproduction:
- Pour the substrate in which the orchid is warm water to soften the soil.
- Tap the walls of the pot with a spatula or palm. It’s easier to separate the lump of earth from the flowerpot.
- Grasp the main stem of the plant and pull, only gently, otherwise the plant will break.
- Clean the root system from adhering soil, pieces of leaves and dried roots.
- With a sharp disinfected knife, divide the main onion into 2-3 parts, leaving at least 4 pseudobulbs on each.
- Slices should be treated with activated or charcoal.Dry the workpieces, and then plant them in separate pots filled with moss and a nutrient substrate.
On the mother's bulb, it is imperative to leave several young pseudobulbs. They contain nutrients that help an adult bush survive division. Otherwise, orchid growth slows down, and the plant does not throw buds or forms too few inflorescences.
One part turned out weaker than the second? You will need a regular bag, which is filled with sphagnum with wet moss, and then a seedling is placed in it. The edges are tightly tied so that moisture remains inside, and put the orchid in a warm place. Water and high temperatures stimulate the growth of new roots. The strengthened seedling is transferred to a pot filled with a substrate for adult flowers.
Tip: A year before propagation, by dividing on an orchid, neat cuts are made, due to which the number of pseudobulbs increases, and the root system becomes thicker. The method makes the mother orchid stronger and helps to adapt after moving to a new pot.
Exotic flower stalk
Monopodial type seedlings are grown from a peduncle. They begin to breed in the fall, when the buds wilted and fell off. The flower stalk is not cut, but left in a pot so that it constantly receives nutrients.

On the largest and strongest kidney, make several small incisions and remove the surface shell resembling scales. Apply a cytokinin paste to the cleaned area, and a small portion of the size of a millet seed is enough.
Keep an orchid in a greenhouse. The bud will turn into a sapling only in conditions of high humidity. It is impossible that the room temperature drops below +25. First, a thin sprout will appear, which will grow stronger and acquire air roots and full leaves. The formed outlet is separated from the peduncle and planted in a separate flowerpot. A young orchid will throw the first buds in 1-2 years.
Propagation by layering
On the stem of some sympodial species, sleeping buds are located. They are located in nodes and under certain conditions can turn into sockets. How to get seedlings without harming the orchid?
In a plastic container with low sides, lay a layer of sphagnum or expanded clay. Moss is preferable, because it retains more moisture and heat. The main stem, peeled from the leaves, is gently tilted to the ground, not separating from the mother bush. A blank with sleeping buds is attached to the tray and covered with a plastic container. In the container, make a special slot for the stem.
Orchids provide good lighting, otherwise the awakening of the kidneys slows down. Warm water is regularly added to moss or expanded clay, but make sure that moisture drops do not fall on the main stem.
The first sprouts appear after 3-4 weeks. If there is nothing, mistakes were made when caring for the orchid.
Wait until the socket has got its own strong roots, and then transplant it into a separate flowerpot. Be sure to water and apply some fertilizer to shorten the adaptation period.
Propagation of orchids is a difficult and time-consuming task. Only experienced gardeners manage to grow a new flower from a cuttings or buds the first time. Seedlings are sick, disappear, do not take root or die months after the transplant. But if you do not despair, experiment and try various methods, one day an orchid blossomed at home from a mother bush will bloom on the windowsill.
Video: how to turn one orchid into 100
Submit