The content of the article
Each housewife tries to preserve vitamins from vegetables, fruits and mushrooms for the winter. One of the proven methods is their conservation. It is difficult to find a person who refuses tea with homemade raspberry jam or a snack in the form of crispy cucumbers. At the same time, so that the blanks please you all winter you need to properly sterilize the cans for them.
Why sterilize cans
Many bacteria and microorganisms live on the surface of the cans. During sterilization, they die due to exposure to heat.
In canned foods, an optimal environment for the life and reproduction of bacteria is created. If sterilization is refused, then the microbes will start the fermentation process in the workpieces and your stocks will deteriorate. This is usually expressed in a bloated cap or clouding of the brine.
Preparing cans for sterilization
- Inspect cans for chips or cracks. A chip on the neck will inevitably lead to bloating and rupture of the lid. A cracked jar can explode when pouring boiling water into it.
- Whole cans should be washed thoroughly with warm water and a cleaning powder. Dry the jars with a towel or just leave them on the table to dry for a while. Only dry containers are recommended for sterilization.
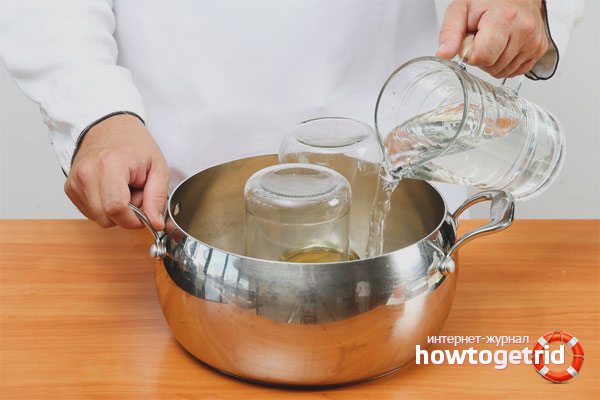
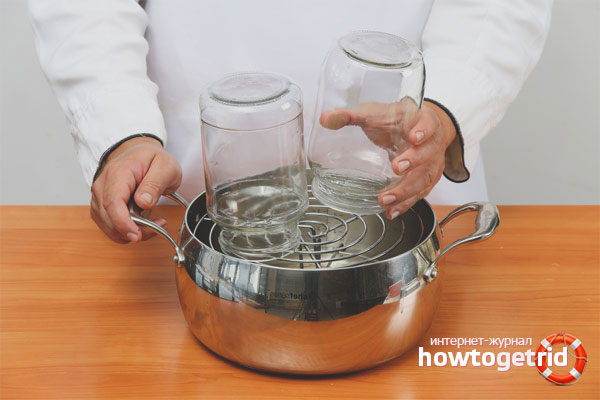
Steam Sterilization
This is the oldest and most reliable method, your mothers and grandmothers must have used it. At the same time, steam cans can be sterilized in different ways.
- Using a kettle, turkish or other dishes with a narrow neck. A jar is put on the nose of a boiling kettle or inserted into the neck of the Turks upside down. One-liter cans are sterilized for 7-10 minutes, three-liter cans - 15 minutes. As a rule, droplets of water cease to form on a fully sterilized jar.
- Using special round lids with openings for the neck of the can. In this case, the pot of boiling water is covered with a lid (it can have one or more round holes) and the cans are inserted with the neck down. If you don’t have such a miracle, you can use a regular metal sieve. However, in this case, most of the steam will be wasted, and this will lead to an increase in humidity and temperature in the kitchen, which is undesirable in the summer.
- In a double boiler. If you are the owner of such a useful assistant in preparing tasty and healthy dishes, then you can use this method of sterilization. Clean cans are placed in a double boiler for 15 minutes and turn on the cooking mode. The disadvantages of this method include the possibility of sterilizing a small number of cans, since the double boiler must be very spacious.
Sterilizing cans in the oven
Clean and necessarily dry cans put in the oven and turn it on to the maximum. Make sure that the temperature does not rise above 200 degrees. After 10 minutes, turn off the oven and leave the banks to cool in it. Do not immediately open the oven, as the glass may burst due to temperature differences.
This method is convenient primarily the ability to sterilize several cans at once. In addition, the temperature in the oven is higher than the temperature of the steam, which allows you to kill more germs.
Sterilization of cans in a microwave oven
This is the fastest and easiest way to sterilize. Depending on the volume of the microwave, one or more clean cans are placed in it. The bottom of the can must be covered with water about 2 cm.A microwave warms up water, not air. The water in the banks boils and steam sterilization occurs. Dry cans in a microwave oven are not sterilized.
With a power of 800 watts, it takes 5-7 minutes to destroy microbes.
Sterilizing cans in the dishwasher
The main advantage of this method is that cans can be loaded into the dishwasher only by rinsing them slightly. In addition, during sterilization, you do not need to be distracted by jars, and you can devote all the time to preparing products for seaming.
So, the dishwasher is turned on at the highest temperature (at least 60 degrees) without the addition of cleaning products.
Among the disadvantages of this method, a low sterilization temperature can be noted, so the effect will be worse than when using steam or an oven.
How to sterilize caps
Lids, like cans, must be washed and thoroughly checked for dents, scratches or rust before sterilization. Threaded screw caps are advised to be updated every year.
Clean lids can be dipped in boiling water for 3 minutes or sterilized in an oven with cans. In no case can you sterilize metal covers in the microwave, this will lead to its breakdown.
Pasteurization
Many housewives do not trust double or even triple pouring boiling water during preservation and resort to pasteurization, that is, to sterilize cans along with blanks. As a rule, it is required for the preservation of cucumbers, mushrooms and in recipes with a small amount of vinegar.
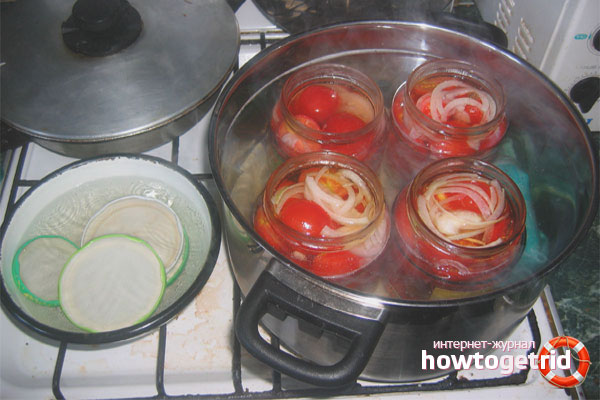
To do this, you will need a capacious pan with a wide bottom. For three-liter cans, an enameled basin is perfect. At the bottom of the pan put a wooden grate or a thin towel and put cans with blanks into it. The neck of the cans is covered with lids, but do not twist them.
The pan must be filled with warm water so that it does not reach the neck of the cans of about 5 cm. After that, the pan is put on fire. The pasteurization time depends on the specific recipe, as a rule, it takes 15-25 minutes after boiling water.
Pasteurized cans are carefully removed from the water one at a time and immediately rolled up. Before cooling, banks are recommended to be left upside down.
What can not be done with home canning
The most common mistakes that mistresses make when harvesting fruits and vegetables.
- Use of poorly washed vegetables and fruits. Before you lay out the blanks on the banks you need to thoroughly rinse them under running water. Dirty vegetables can cause clouding of the brine. In addition, no one will like the crispy sand on their teeth in a snack.
- Use old spoiled lids. Even a small defect on the screw cap will inevitably lead to its swelling. Remember also that vacuum caps, although very convenient to use, retain their airtight properties for only 3-4 months. If you want your workpieces to stand longer, use other options.
- Incorrect pasteurization of cans. You can not put cans with blanks directly on the bottom of the dishes in which pasteurization is carried out. It is also undesirable that the sides of the cans come into contact with each other when boiling. Put them away one from one or shift them with a towel.
So, the sterilization of cans and lids is an integral step in the conservation of products. Regardless of which sterilization method you choose, carry it out according to all the rules. In this case, until spring, you can delight and surprise loved ones and friends with their culinary masterpieces under the hood.
Video: how to sterilize cans


Submit