The content of the article
The beauty of a private home begins with stairs and railings. These elements have always been given special attention. It is on them that the guests of the owner turn their eyes when they enter his house. Nowadays, anyone can get a beautiful staircase and luxurious railings. For this, huge wealth is not needed.
The modern construction market is filled with various offers. But there are still craftsmen in the world who prefer to equip their housing on their own. It is for such people that this article will be useful. It details the technique of hand-made railing creation. If everything is done correctly, you will succeed in a beautiful and original way.
If you decide to make a railing for the stairs yourself, then start with a detailed study of the requirements and rules. Do not neglect them! Despite the fact that each staircase is unique, the design is based on generally accepted standards that will make it convenient to use.
Railing Design Requirements
There is a general rule according to which the height of the railing, counted from any step, should not exceed 100 cm throughout the entire length of the stairs. Such a norm has been developed by practice and is the most convenient. But there is an exception associated with the great growth of the owner of the house. For such a person, the railing is made 120 cm high.
There are stairs with a two-sided version of the railing. They are placed if the width of the stairs exceeds 125 cm. Do not forget about the distance between the balusters, which should not exceed 15 cm. Keep this in mind if you have small children.
All of the above standards apply to structures of any material, whether it is wood, metal or plastic. This article will consider in detail only the first two options. The latter is the result of industrial production.
Wooden railing
Mankind has discovered the unique properties of wood a long time ago. It is easy to process, has a good margin of safety, a beautiful structure and a pleasant aroma that fills the house with natural freshness. With proper impregnation, wood is almost not subject to aging and destruction. All of these properties give reason to use wood for the construction of stairs and railings. Having dealt with the standards and calculations, you can proceed to the next stage - preparation of tools.
When working with a tree, you need the following set of tools:
- several hammers (of varying severity);
- carpentry chisel;
- wood hacksaw;
- several screwdrivers (curly and flat);
- bit;
- electric drill;
- sandpaper;
- jigsaw;
- construction level;
- square;
- screwdriver.
Expendable materials: nails, screws, drills, a simple pencil.
A special machine is used to create complex staircase elements, but this is not necessary. For manual work, it is better to give preference to simple, but no less beautiful forms of railings.
Material selection
If the preparatory measures are done, then it's time to purchase the material. The most common types of wood used for the manufacture of stairs and railings are:
- Pine;
- Birch tree;
- oak;
- ash;
- maple;
- beech.
The list is not exhaustive; you can choose another wood. The listed species have long been proven in use. Species such as pine and birch are widespread, therefore, have been used for many centuries.
The process of making wooden railings
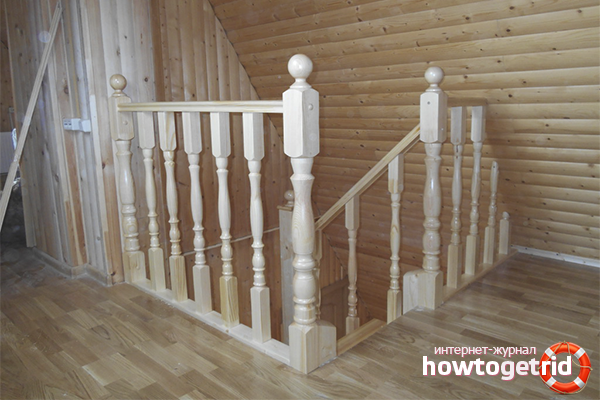
As you know, the railing consists of three elements:
- Handrails are the top of the railing, which people hold on to when they descend the stairs. They should have a well-crafted, smooth surface.
- Balusters are various forms of the rack located between a hand-rail and steps.When installing, it is necessary to observe a certain distance between them.
- Turning and end curbstones are massive racks located at the end of the railing and in places of bending.
For the manufacture of these parts, wooden bars with different cross sections are needed. Using a jigsaw, the bars are given the necessary shape, and then they clean and grind the surface.
During the manufacturing process, make sure that there is no shortage of material, because not all produced elements will fit. There will be mistakes that cannot be avoided. Therefore, there must be a supply of wood.
After all the elements of the railing are made, proceed to assembly. In places where there will be a mount, holes are made. Then install the lower racks - first the cabinets, and then the balusters. Take care that the distance between the balusters is at least 10 cm.
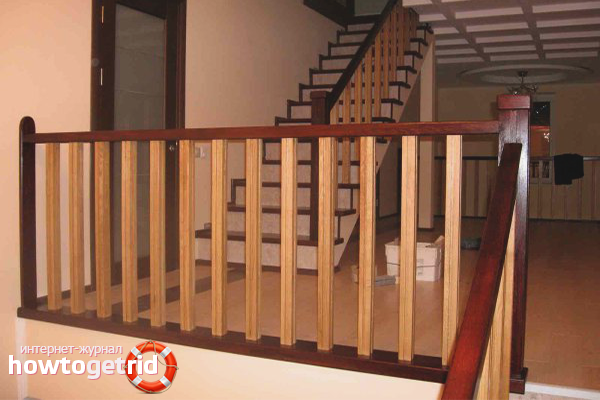
After assembly, the finished railing is installed on the stairs and again cleaned with a finer sandpaper. Then they are carefully painted, impregnated or varnished. At this, the manufacture of wooden railings is considered complete.
Forged railing
With a wooden railing, everything is relatively uncomplicated, but forged things are much more difficult. But the result is worth it, because with iron the master can reveal his imagination in full and come up with a completely unique pattern. Consider the creation process in more detail. The steps for making forged railings are very similar to creating wooden ones.

For work you will need:
- welding machine with a set of electrodes;
- a grinder with several nozzles;
- special disk for stripping;
- protective mask;
- gas key;
- trumpet;
- hammer;
- level;
- teski.
The process of manufacturing forged railings
The manufacturing process of forged railings begins with calculations. Make all the necessary measurements and purchase material. Typically, metal profiles and metal products with different cross-sectional sizes are used. We will create railings by cold forging.
- Sketch. In order not to be mistaken in the calculations, it is recommended to draw a sketch in a 1: 1 scale. Find a spacious area where it is convenient to create a railing design drawing. First draw a wireframe and add individual elements to it. This will help form a general idea of how the workpieces will look.
- Pattern. When the sketch of the base of the railing is ready, you can begin to create a pattern. It, like the railing itself, must be drawn on a natural scale. Take a piece of rope 50 cm and lay it on each pattern. This method will help measure the length of the bending elements. Then make notes of the sizes by which you will cut the blanks for forging the pattern.
- Cutting. After making the necessary measurements, proceed to cutting the material. Try to cut workpieces with a small margin in length. This will help to avoid many mistakes during forging. Excess can always be cut off.
- Forging. Each blank must be shaped. Use a vise to bend metal sections. For convenience, you can put the pipe on the workpiece and use it as a lever. Then physical effort will be minimal. The pattern should turn out, such as in the drawing. This procedure must be carried out with all structural elements.
- Welding. Next you need a welding machine. First make the railing frame. Having connected the segments, fix them by spot welding. Then, inside the frame, as in the drawing, put the finished elements one by one and also grab it. Filling the frame with patterns and not finding any errors at the same time, you can safely boil the design. Turn it over to the other side and also have a good weld in the rest of the sections. On this rough work is completed, the railing is ready.
- Stripping. Now the time has come to think about the aesthetics of the design: take a grinder, install a grinding disc on it, put on a protective mask and go through all the seams. Then, using a metal brush, clean the entire structure from bumps, defects and rusts.
- Painting. The final step will be the painting of the railing.First, treat the entire structure with a primer for metal, this will ensure reliable adhesion of the paint to the surface. To paint the railing, you can use a brush or spray. Apply several coats of selected paint at intervals of 15 minutes. Some owners handle the patina forged railing; it's inexpensive and looks great!
This completes the railing manufacturing process. It remains only to install them on the stairs.
Self-made railing is not a difficult task. If you have a desire, time, small means and at least a minimum experience of working with your hands, you will surely be able to create railings from which people cannot take their eyes off.
Video: making a handrail on a spiral staircase


Submit